Security settings in Office 365 for analysis
Microsoft has announced that running macros will be blocked by default in Office 365 in files downloaded from the inernet as from June 2022. This affects the opening/editing of analyses. This is because you can no longer easily activate blocked macros.

Note:
Update May 12, 2022: Microsoft has withdrawn the measure described above. For more information, see the Microsoft website. This help item will remain available until we know more about this subject.
|
Contents |
What are the options?
What is the impact of this change?
Microsoft indicates that for files downloaded from the Internet, running a macro in such a file is blocked by default. The final version of the Office update has not yet been released. In addition, there are many different Office security settings that you as a user or organization can determine yourself. AFAS can therefore not say for sure what the change will mean in practice for each AFAS customer.
It is expected that this change by Microsoft will have an impact if you download an analysis via InSite and want to run a macro in it.
This Office change is not expected to have any impact in the following situations:
- The analysis does not contain a macro.
- You open the analysis, but it contains a macro that you do not execute.
- You edit a macro, but you do not execute it.
- You open an analysis by clicking on the Profit Communication Center notification.
- You download the analysis with macro to be executed from Profit (via General / Output / My Files).
- You have defined settings to allow macros to be executed in analyses.
The change does not apply to the publication of cockpit analyses, this takes place on the AFAS servers.
The Office version concerned:
- See this article from Microsoft for more information and the versions (delivery schedule) affected by this change. If you use this Office version, this has consequences for editing and consulting analyses.
- It only concerns Windows versions of Office, not other operating systems such as Mac, Office Web or Office for Android or iOS.
In what ways can you continue to work safely?
The methods below are possible solutions. AFAS cannot provide advice on this, as this is something that falls under your own system management. The IT administrator in your own organization must therefore determine the best method.
- Method 1: Open analysis via PCC notification or Profit
Open the analysis through the Profit Communication Center notification or through My Files in Profit.
- Method 2: Unlock manually the downloaded file one time at a time
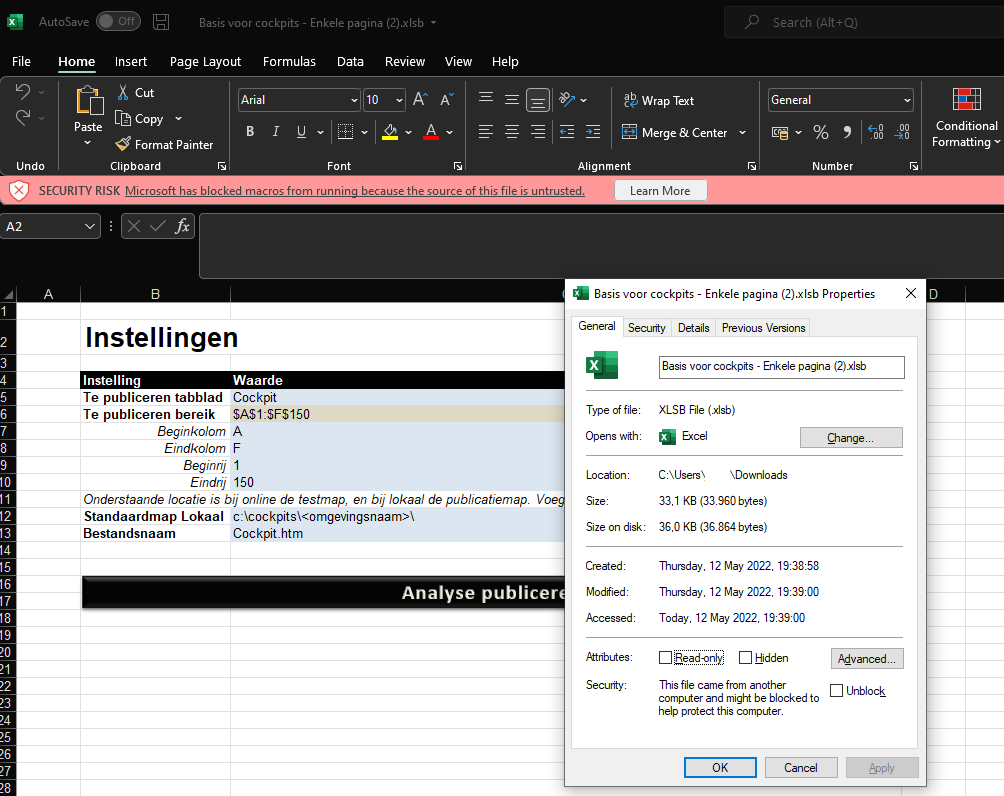
If you downloaded the analysis through InSite, the file is blocked by default. You can unblock the file, you must do this with each download.
- Method 3: Add the InSite as trusted sites of Windows
This will prevent Windows from marking the file as an unsafe download causing Office to block the execution of macros.
- Method 4: Open the analysis using a safe location
This method works for Profit analyzes and your own analyses. This method is recommended if you use the Vernet absence data (Profit) analysis to provide Vernet with absenteeism data. AFAS recommends that Vernet always use the Profit analysis, not a copy.
- Method 5: Link a certificate to the macros in the analysis
This allows you to continue to use your own analyses. You link a certificate in every analysis, with this you indicate that the macros may be executed.
This method does not work for Profit analyses, because these never contain your own certificate. If you want to secure a Profit analysis with a certificate, you must first make a copy of the analysis.
- Method 6: Use a Microsoft-policy
Let op:
Other than the Office 365 security policy changes described here, Office 365 Defender Endpoint Attack Surface Reduction may be enabled in the organization. This may cause the following message: File cannot be opened because the file format or file extension is not valid.
Method 1: Open analysis via PCC notification or Profit
When you download the analysis through InSite your computer marks it as unsafe. You prevent this by one of the following methods:
- If the Profit Communication Center is installed and connected, you will get a popup as soon as the analysis is ready. Clicking on this will open the analysis directly in Excel.
- If you open an analysis via Profit, download the analysis file via General / Output / My files.
Method 2: Unlock manually the downloaded file one time at a time
If the execution of macros is blocked in the analysis, you will see the red balk below:
If you click on the red bar of the notification the following article opens. In it, Microsoft explains the situation and how you can unblock the file one at a time so that you can still run the macros.
Method 3: Add the InSite as trusted sites of Windows
- Press the Windows key and search for 'internet'.
- Open 'Internet options'.
- Go to the 'Security' tab.
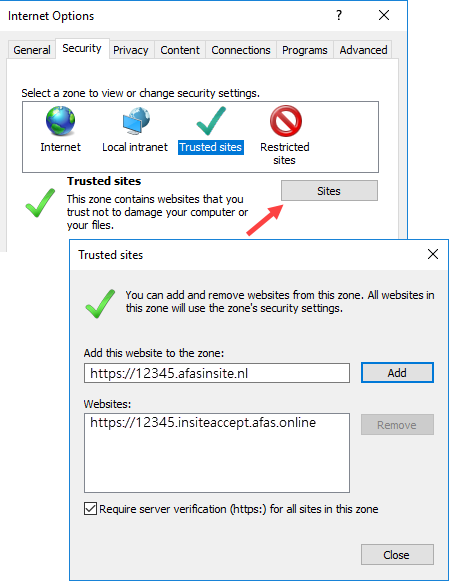
- Click on 'Trusted Sites' and then on 'Sites'.
- Add the address of your InSite, possibly also that of your Test-site (and possible Accept-site).
For example, https://12345.afasinsite.nl and https://12345.insitetest.afas.online
The system administrator may be able to set this for all users with a group policy.
Method 4: Set secure location
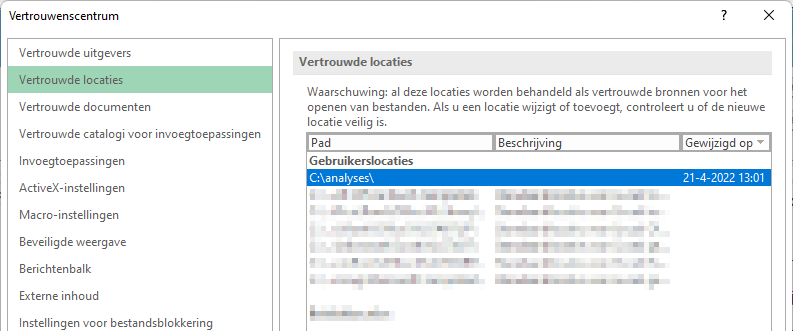
You define a secure file location in Excel. When an analysis is opened from this location, the macros can be executed.
Note:
If you open an analysis from Profit, it will be saved in the Downloads folder on your PC by default. Every time you open an analysis, you have to move it from the Downloads folder to the secure folder and then open the analysis. If you find this too difficult, it is better to use certificates.
You cannot attach a certificate in relation to Profit analyses. You need to move the analysis to the secure folder.
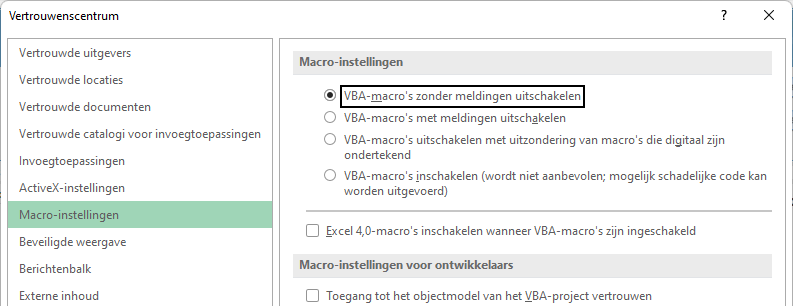
 Steps to set up a secure location
Method 5: Linking the certificate to an analysis
You can use the certificates in the following situations:
- For all analyses that you have created/changed in the past.
- For new analyses based on a Profit analysis or a data collection.
If you have linked a certificate in an analysis and you copy this analysis, the new analysis will also contain the certificate. In this situation, you do not therefore need to link a certificate.
Attention:
Your certificate is not used when generating cockpits via AFAS Online. AFAS handles security in a different way so that your macros continue to work.
AFAS itself does not issue certificates for customers. After all, AFAS has no insight into the macros that are created and used by customers, so you have to use your own certificate.
There are different ways of using certificates. The IT administrator in your own organisation must decide what the best option is. Using a centrally managed certificate will cost you more effort and time in the beginning, but it is the easiest approach for your users. These are the possibilities:
- Your organisation buys a commercial certificate.
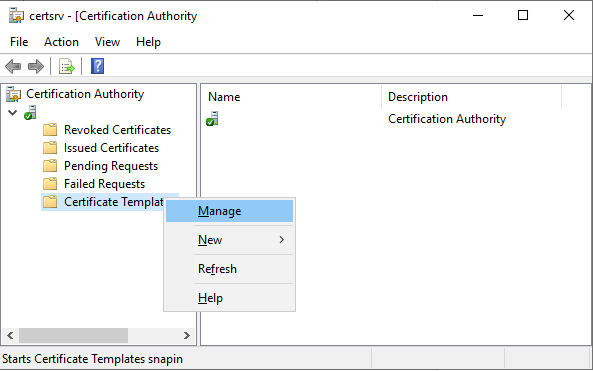
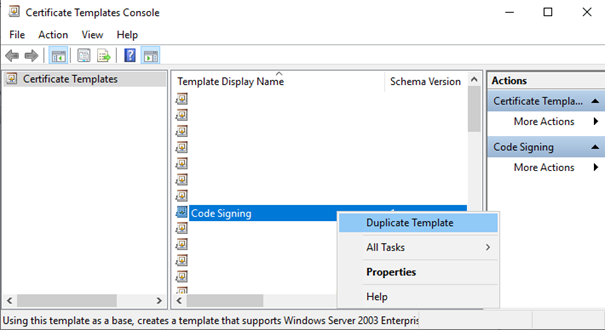
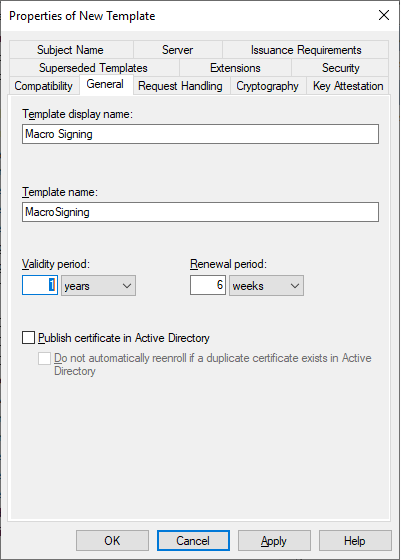
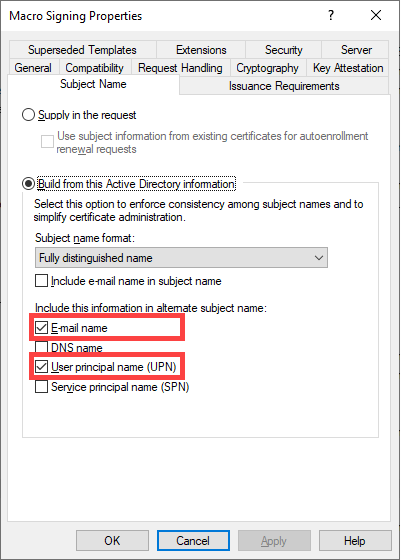
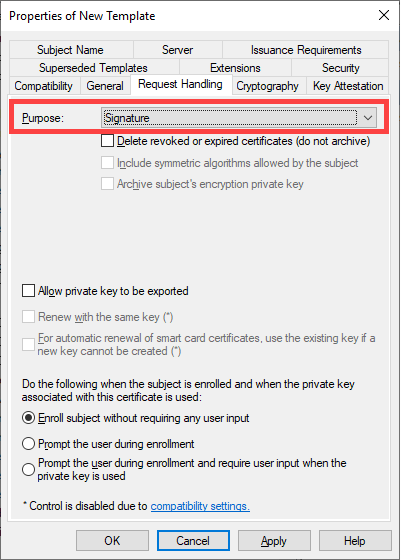
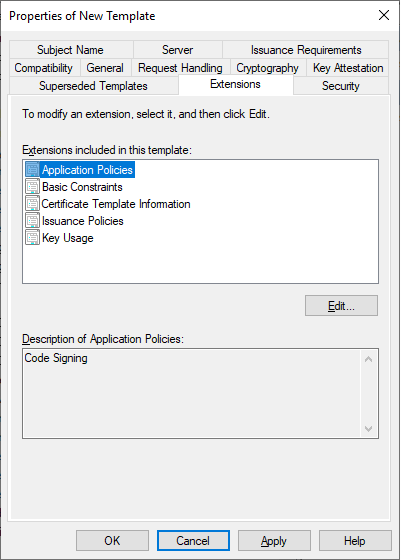
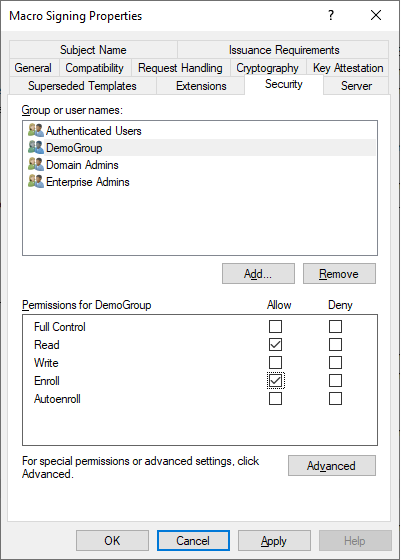
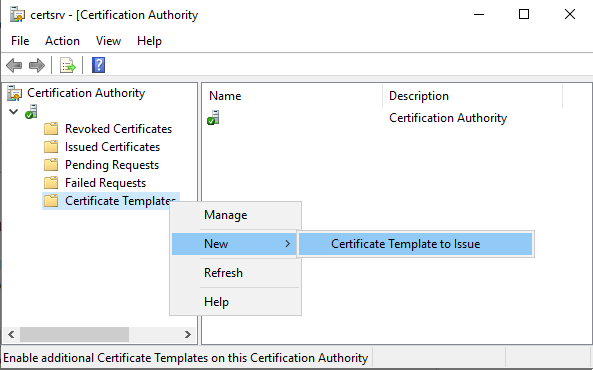
- Your organisation has an internal Certificate Authority (CA) that issues certificates. This allows you to issue certificates for the entire organisation. This does not involve any additional costs, which a public/commercial certificate would.Steps to issue certificates using a Active Directory Certificate Authority
- You use a self-signed certificate and you link it in the Excel file.
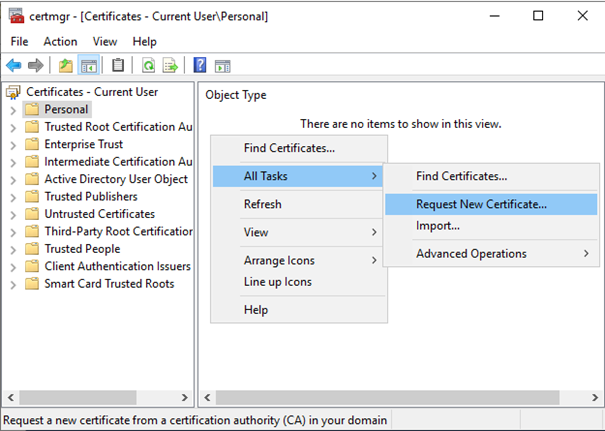
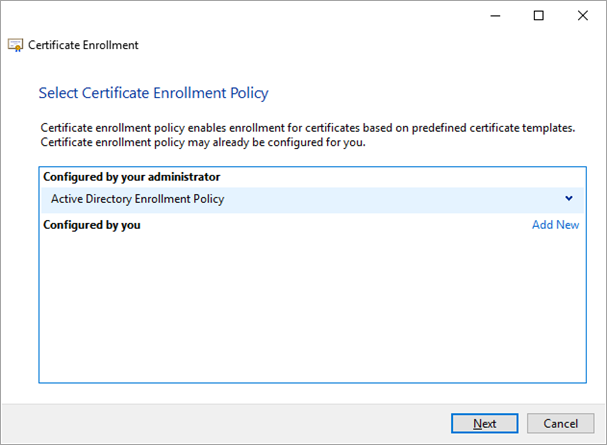
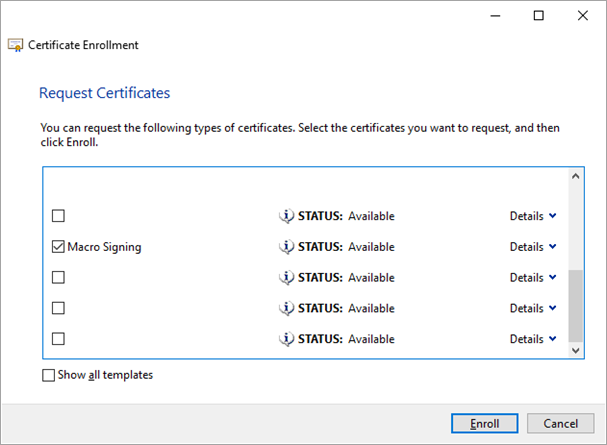
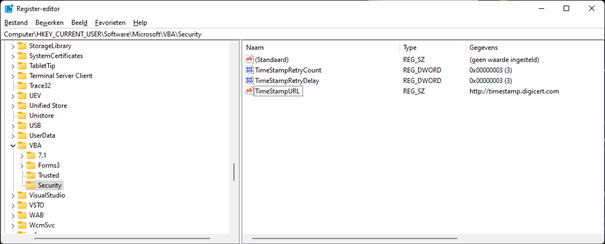
Method 6: Microsoft policy
You can use the certificates in the following situations:
- For all analyses that you have created/changed in the past.
- For new analyses based on a Profit analysis or a data collection.
If you have linked a certificate in an analysis and you copy this analysis, the new analysis will also contain the certificate. In this situation, you do not therefore need to link a certificate.
There are different ways of using certificates. The IT administrator in your own organisation must decide what the best option is. Using a centrally managed certificate will cost you more effort and time in the beginning, but it is the easiest approach for your users. These are the possibilities:
- Your organisation buys a commercial certificate.
- Your organisation has an internal Certificate Authority (CA) that issues certificates. This allows you to issue certificates for the entire organisation. This does not involve any additional costs, which a public/commercial certificate would.
- You use a self-signed certificate and you link it in the Excel file.
Note:
The use of commercial certificates and an internal Certificate Authority (CA) is not explained in the Help Centre. For inspiration you can consult this document from Quo Vadis . There are, of course, other suppliers of certificates and the steps for obtaining a certificate differ from one supplier to another.
The following steps explain how to create a self-signed certificate and link it in Excel. The certificate is on your PC. You cannot then perform the analysis on another PC unless you export the certificate and import it on the other PC. See also the steps below.
When generating cockpits via AFAS Online, your certificate is not used. AFAS processes security in a different way so that your macros continue to work.
AFAS does not issue certificates for customers. After all, AFAS has no insight into the macros created and used by customers so please use your own certificate.
Step 1: Create self-signed certificate:
You create the certificate and place it in the Trusted Root Certification Authorities/Certificates folder.
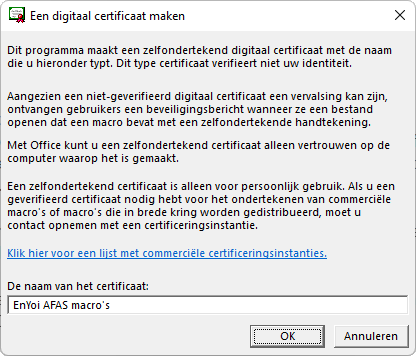
- Start the SELFCERT.EXE tool.
This article indicates the folder where you can find the tool.
If you are not allowed to start the tool or if you cannot find it, contact the system administrator in your own organisation.
- Enter a name and click OK.
- Press the Windows key on your keyboard and run certmgr.msc.
- Copy the certificate from the Personal folder to Trusted Root Certification Authorities/Certificates.
If you drag the file, you must hold down CTRL while dragging. This ensures you copy the file.
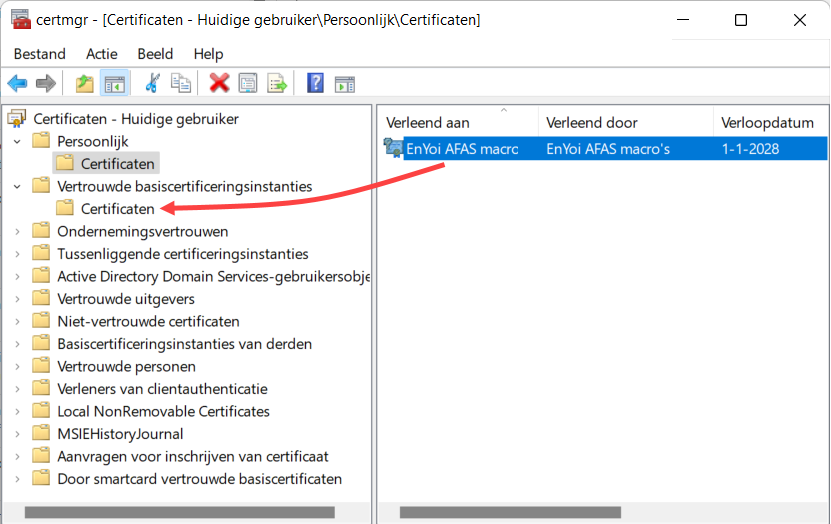
- A message follows. Read the message carefully and confirm it to move the certificate.
Step 2: Linking the certificate in Excel:
- Open Profit.
- Go to: General / Output / Management / Analysis.
- Open an analysis in Excel.
- Go to View/Macros and open a macro.
- Go to Tools/Digital signature and link the signature.
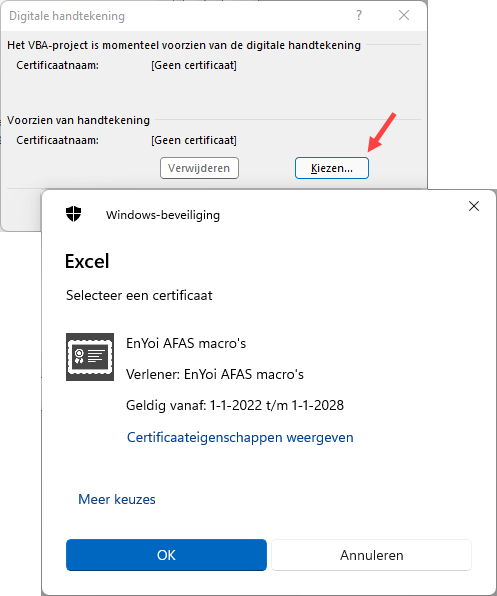
- Go to: PROFIT ANALYSIS/Save in Profit
See also:
Step 3: Configure Excel for the use of certificates:
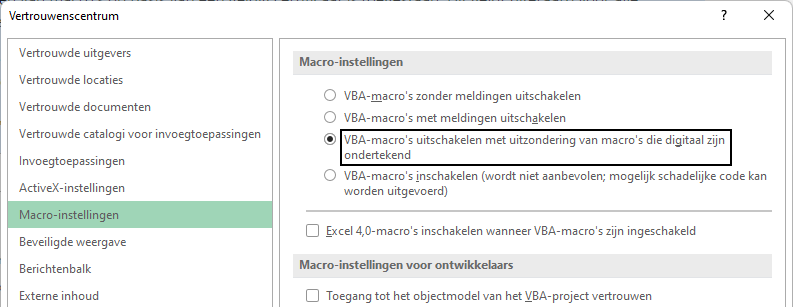
You configure that the execution of macros based on a valid certificate is allowed. This, of course, applies to all macros in Excel, not just AFAS analyses.
- In Excel, go to File/Options and then to the Trust Centre tab.
- Click: Trust Centre Settings.
- Go to the tab: Macro settings.
- Select Disable VBA macros except those that are digitally signed.
You have now finished configuring the use of certificates. Use the steps below to manage certificates.
Manage, export and import certificates:
- Start the command prompt (CMD) and run certmgr.msc.
- You can find your own certificates here. If you right click on a certificate, you can export it.
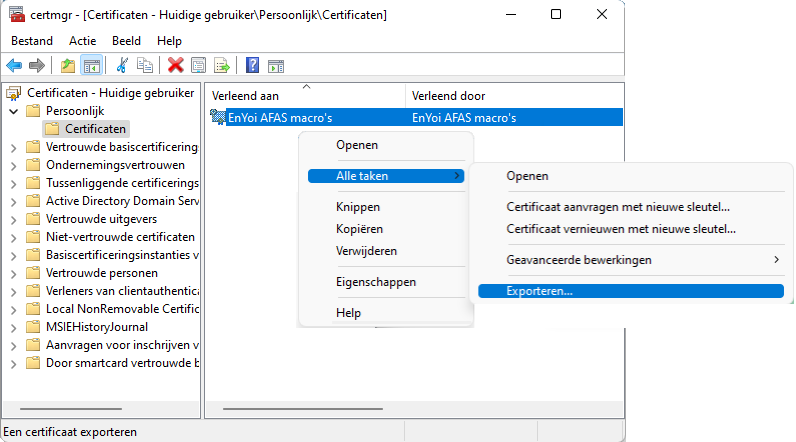
- If you want to import a certificate on another PC, open certmgr.msc on that PC.
- Open the Personal/Certificates folder.
- Go to: Action/All tasks/Import.