An InSite page is based on a template. Per template you can specify if related pages must be authorised automatically. This only applies to InSite templates. You cannot change the linked functions with regard to templates that are linked to InSite and OutSite or only to OutSite.
Note:
Default templates and functionalities are supplied with Profit. If you use them, new InSite pages are automatically linked to certain functionality and therefore authorised automatically.
This link only applies to new pages. If you add a new page in InSite, it is automatically linked to the relevant functionalities and, with that, automatically authorised.
Example:
Add the EnYoi verlofboeking page in InSite. This page is based on the My leave entry template.
In the properties of the My leave entry template, the ESS Leave functionality is linked to new pages. This means that the new EnYoi verlofboeking page is automatically linked to the ESS/Leave functionality. Because of this, users with rights to this functionality, will automatically be able to access the EnYoi verlofboeking page.
Exceptions:
- This link does not apply to new overviews. A new overview is always based on an existing overview and will also copy the authorisation of the existing overview.
- This link does not apply to new portal pages that are a copy of an exiting portal page. The link does apply to fully new (blank) portal pages.
To view templates for functionality:
- Go to: Go to: General / In & OutSite / Configuration / Functionality.
- Open the properties of the functionality.
- Go to the tab: Templates.
You will see the templates that are linked to the functionality.
- Open the properties of a template.
- Go to the tab: New page functionality.
You will see the functionalities that are automatically linked to a new page, when you add a new page.
Link functionality to a template
In this example you make sure that a new overview page with subscriptions is automatically linked to the functionality.
- Go to: General / In & OutSite / Template.
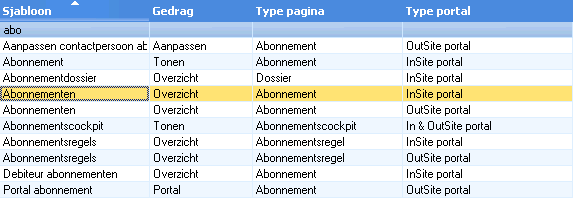
- Open the properties of the Subscriptions template (InSite portal).
- Open the properties of the template.
- Go to the tab: New page functionality.
The default functionality, Consult subscriptions, cannot be deleted. However, this functionality is not used in the template environments, so by default new pages are not authorised.
- Click on: New.
- Select the check box for the functionality that you want to be authorised automatically.
- Click on: Finish.
- Click on: OK.
- Go to: InSite.
- Click on: Site management.
- Click on: Menu in the Site frame.
- Click on: New. You do this after Cockpits:.
- Enter Contracten in Menu item.
- In Action, select Create new overview.
- Click on: Next.
- Complete the fields.
- Click on: Next.
- Click on: Add.
- Go to: Cockpits / Contracten.
- Click on: Publish.
- Click on: Yes.
- Go to: Profit Windows.
- Go to: General / In & OutSite / Configuration / Functionality.
- Go to the tab: Pages.
 View templates