Specific registration and confirmation page per course

You can create a specific registration page for a course. Using such a page, you record the data and layout you want to show in InSite and/or OutSite for the selected course. This information is shown when a participant registers for a course event. The same applies to the confirmation page. After completing a registration, the participant is redirected to the confirmation page. You can also record specific information to be shown on the confirmation page, like the route guidance, specific details, etc.

If you want to create a specific page for a course, you first add a profile of the Registration of participant type. You then link this profile to the course. Finally, you log on as site administrator on InSite and/or OutSite and edit the registration page.

When you add a profile, new pages are generated for the course registration and the course confirmation. These new pages are generated on the basis of the default templates:

  • Register
  • Confirmation

No profile

If you do not select a profile, the participant sees the default registration page.

Add a Registration of participant profile:

  1. Go to: General / In & OutSite / Profile.
  2. Click on: New.
  3. Enter a description in Name. For example, enter the course name.
  4. In Profile, select Registration of participant.
  5. Click on: Finish.

Add context to the profile:

By using contexts, you can specify which fields are displayed, which fields are mandatory, etc. Adding a context is not mandatory. If for a certain course you always want to know whether dietary restrictions apply for somebody, you make the relevant field Mandatory. For an event that never includes a lunch, you set this field to Not displayed. All of this can be set up in the context.

  1. Open the properties of the profile.
  2. Click on: Maintain after Register OutSite.

    You can now use the Management Tool to add the context.

  3. Click on: New.
  4. Enter the description. 
  5. Click on: Finish.
  6. You can now adjust the field settings of the profile.

    More information:

    Change the field settings of a profile

    You record the default settings of the profile. These settings are applied automatically when you use the profile in InSite.

    The field settings have been divided into several groups which are called 'contexts'. You first have to add a context and then link it to a profile. You can reuse a context in other profiles.

    Field settings determine the behaviour of fields, for instance if a field is mandatory, if it is changeable, or if it has a certain (changeable) preferred value. The site manager can record field settings that apply for all users. Use field settings to optimise the daily processes, prevent errors and improve the consistency of your company data.

    The fields under the context are not mutually dependent. This means that, for example, in case of a preference by wage scale, Profit not only shows the steps of the relevant wage scale, but also the steps of other wage scales. When configuring the preferred values, you select the dependent values.

    Example:

    You want to link the default full-time timetable to a profile for reporting the start of employment of full-time employees. In the Empl./timetable context, you enter the default timetable for full-time employees as the preferred value in the Default timetable field.

    You have the option to make the field not visible, so the user does not see the preferred value and as a result cannot make any changes when reporting a full-time employee's start of employment via InSite.

    Note:

    If you want to apply the position allocation in a profile, select the Preferred value check box for the Position allocation usage field in the Org. unit/job context.

    To change the field settings of a context:

    1. Go to: General / In & OutSite / Profile.
    2. Open the properties of the profile.
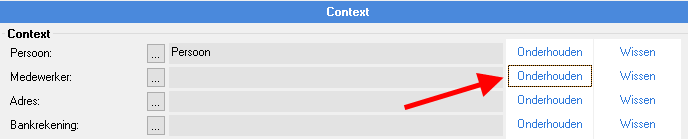
    3. Go to the tab: Context.

      Ins_Veldinstellingen van profiel aanpassen

    4. Click on: Maintain (behind the context you want to change).

      Th existing contexts are shown in the Management tool. Existing contexts can be linked to other profiles.

    5. Add a context:
      1. Click on: New.
      2. Enter the description.
      3. Click on: Finish.

      In the bottom part of the window you see the fields you can change for the context.

    6. Open the field settings of the field.
    7. Go to the tab: Administrator settings.
    8. Enter the field settings for the administrator.

      You enter a preferred value if a field often has the same value. When adding a job, you can skip this field if at that moment it has the correct value.

      1. Select Preferred value.

        You select the value you want to be suggested by default when entering new data in Preferred value.

        If the field is a custom field and has no fixed values, you can enter your own value here. Select the following for NL for Netherlands atCountry of birth:

      2. Select Preferred value by means of a field formula

        Select this option and click on the Show formulas button. The possible formulas for this field are now shown. However, field formulas are not possible in all fields: in date/time fields you can have a date/time determined using tags and in text fields you can have the code of the user/employee currently logged on suggested.

      3. Select Copy preferred value of the manager (user only)

        Select this option if you, as a user, want to copy the preference set by the site manager.

    9. Select the Last selected value check box if you use the same value frequently.

      Example:

      In an entry layout you use daily to enter the hours and that is based on a month, you can set the month field to Last selected value. If you set this field, you only need to select the correct month once a month and the rest of the month you can skip this field.

    10. Deselect the Visible check box.

      The field is no longer visible within the context of the functionality.

    11. Deselect the Changeable check box if you do not want to allow users to change this field.

      If a user is always allowed to change the field, select this check box.

    12. Select the Mandatory check box if you always want a field to be completed by a user. This means your database is always complete with the information you need.
    13. Go to the tab: User settings.
    14. Enter the user settings.

      Here, too, you can enter a preferred value, specify that you want to copy the last selected value for this field and set whether the field is changeable.

    15. Close the Management tool. 
    16. Select the field settings for Empl./timetable.
    17. Click on: OK.
  7. When you have set all fields, close the Management Tool.
  8. Select the correct context in Register OutSite.
  9. Click on: OK.
  10. You can now link the profile to a course.

Directly to

  1. Configure a course in OutSite
  2. Overview of participants to a course event
  3. Specific registration page per course