Add a registration form

You add a registration form if the visitors need to complete an input form before they can access a specific page or a file if they want, for example, to download a brochure.

To add a registration form:

  1. Go to: General / In & OutSite / Input form / Input form.
  2. Click on: New.
  3. Enter the Description of the new form. This is the title of the form.
  4. Select the Register type.
  5. Select Apply CAPTCHA if you want the user to first type in some displayed words. This allows you to test if someone is actually sitting in front of the screen.

    The tool only appears if Captcha is configured for the site domain in which the input form is applied.

  6. Select the Submit file item when sending form check box if you want to save the form in the dossier of a person or organisation. The dossier item type must be present! You need to activate Available for input forms for the dossier item type. If you want it to be possible for the visitor to send an attachment with the form, you also need to select the Link file check box.

    More information: dossier item type

    You can save the completed form in the dossier of the person or organisation. You can only do this if a dossier item type is linked to the input form.

    An exception here is an input form of the type Course Registration. For this input form, a default dossier item type Course Registration (Profit) is available. The workflow Course Registration is linked to this dossier item type.

    To make a dossier item type suitable for an input form:

    In the demo environment, the input form is linked to the Dossier item type . In this example you have a look at this Dossier item type.

    1. Open Profit.
    1. Go to: CRM / Dossier / Configuration / Dossier item type.
    2. Open the properties of the dossier item type..
    1. Open the properties of the dossier item type.: .
    1. Go to the tab: General.
    1. Check if the Available for input forms check box is selected.
    1. Select the Available for input forms check box.
    2. Select the Link file check box if you want to allow attachments to be added to the input form.
    3. Go to the tab: Destination.
    4. Check if at least one destination of the dossier item is set to Optional.

      The destination of a dossier item determines the dossier in which you can add and view the item. You can select multiple destinations. For example, if you select organisation/person as destination then you can open the submitted dossier item from the dossier of the organisation and/or person. You specify the destination per dossier item type.

      For example, if you have linked an input form for an Organisation/Person then you set this destination to Optional. When the form is submitted, you can then select the correct Organisation/Person.

      If you select the available for input forms check box then no destination may be linked with Mandatory or One of these mandatory.

    5. Click on: OK.
    1. Select the dossier item type that must be submitted.
    2. Where applicable, select a feature group that starts a workflow, if one exists.
    3. Enter a description for the dossier item. You will see this description again in all the forms submitted by the customer. You can also filter on this.
    4. In Attachment, specify whether an attachment is allowed or mandatory. By default, no attachment is allowed.
    5. More information: attachment allowed

      An attachment can be added to a completed form. You can allow this or even make it mandatory.

      The visitor can use an attachment to quickly and easily add information that does not fit into the existing fields. Consider for example, Images, Word documents or PDF files.

      Whether or not an attachment can be added to an input form is something you set up in the dossier item type and in the input form.

      The maximum file size and the allowed file types for an attachment to an input form are the same as the size and types of a dossier item attachment.

      View/set the dossier item type:

      For the dossier item type, the Available for input forms and Link file check boxes must have been selected.

      1. Check the linked dossier item type.

        You can save the completed form in the dossier of the person or organisation. You can only do this if a dossier item type is linked to the input form.

        An exception here is an input form of the type Course Registration. For this input form, a default dossier item type Course Registration (Profit) is available. The workflow Course Registration is linked to this dossier item type.

        To make a dossier item type suitable for an input form:

        In the demo environment, the input form is linked to the Dossier item type . In this example you have a look at this Dossier item type.

        1. Open Profit.
        1. Go to: CRM / Dossier / Configuration / Dossier item type.
        2. Open the properties of the dossier item type..
        1. Open the properties of the dossier item type.: .
        1. Go to the tab: General.
        1. Check if the Available for input forms check box is selected.
        1. Select the Available for input forms check box.
        2. Select the Link file check box if you want to allow attachments to be added to the input form.
        3. Go to the tab: Destination.
        4. Check if at least one destination of the dossier item is set to Optional.

          The destination of a dossier item determines the dossier in which you can add and view the item. You can select multiple destinations. For example, if you select organisation/person as destination then you can open the submitted dossier item from the dossier of the organisation and/or person. You specify the destination per dossier item type.

          For example, if you have linked an input form for an Organisation/Person then you set this destination to Optional. When the form is submitted, you can then select the correct Organisation/Person.

          If you select the available for input forms check box then no destination may be linked with Mandatory or One of these mandatory.

        5. Click on: OK.

      To allow adding an attachment to an input form or make it mandatory:

      1. Go to: General / In & OutSite / Input form / Input form.
      2. Open the properties of the input form.
      3. Select the Submit file item when sending form check box.
      4. In Dossier item type, select the dossier item type that allows a file to be linked to it.

        If it is possible to link a file, you can change the Attachment field.

      5. Select Possible for input form or Mandatory for input form in Attachment. Initially, an attachment is not allowed.
      6. Click on: OK.

  7. Click on: Next.
  8. Select how the personal details are entered. You can choose from:
    1. Do not copy, always complete manually: you can use this option to enter someone else's details, for example to enrol him or her for a course.
    2. Copy from logged-in visitor (completion on behalf of another is allowed): you can use this option if it is likely that someone wants to provide his or her own details, but is also permitted to enter someone else's details, for instance: Geef het bedrijf op voor de AFAS Awards.
    3. Copy as fixed value from visitor logged in: you select this option if the logged-on user is only permitted to enter his or her own details, such as: Geef je mening over de website.
  9. In Show as, you indicate when and how often the visitor must complete a form:
    1. This form has not yet been completed in the session. If a visitor remains logged in, he only needs to register once.
    2. If no form from the group has been completed yet in the login session. If a visitor can download multiple brochures from the site, you do not want him/her to have to register each time. You can add these brochures to an input form group. As soon as a form from this group has been completed, the visitor - as long as he or she remains logged on to the site - does not need to complete any further registration forms!
      If a visitor logs off, the session expires and he or she has to register again if he/she wants to request a brochure.

      More information:  how often should an input form be completed

      For a registration form, you can configure it so that a visitor only has to register once in a session. For example, if a visitor wants to request a number of brochures, he only needs to enter his details once. For a registration, you want to make it possible for the visitor to complete the form a number of times. The visitor can then register for multiple courses or register a colleague.

      A session is the period of time during which a visitor is logged on to the site. If the visitor logs out and then back in, a new session begins.

      To configure one-time registration for each session and input form group:

      1. Go to: General / In & OutSite / Input form / Input form.
      2. Click on: New.

        You can also open the properties of an existing input form.

      3. Enter the description.
      4. Select the Register type.
      5. Complete the remaining fields.
      6. In the Show as field, select the In the session no form from the group has been completed. value.
      7. Select the input form group.

        You can also add a new group.

      8. Click on: Finish.

        If a logged-on visitor has completed a form from a group and after this he/she wants to complete another form from the same group, he/she does not need to register again.

      To configure one-time registration for each form:

      1. Go to: General / In & OutSite / Input form / Input form.
      2. Click on: New.

        You can also open the properties of an existing input form.

      3. Enter the description.
      4. Select the Register type.
      5. Complete the remaining fields.
      6. In the Show as field, select the This form in the session has not been completed yet. value.
      7. Click on: Finish.

        If a visitor logged on has completed a form, he does not have to register again if he wants to complete the same form again in the same session.

  10. If you selected the 'No form from group has yet been completed in the session' option in Show as, you now select an Input form group.

    Click on: New and add a group.

  11. Enter any other text that should appear next to the send button in the form.
  12. Click on: Finish.

    Profit nor automatically opens the Management Tool. For every input form, Profit automatically adds a tab in the Management Tool with the same name as the input form. Thus for each input form you can add tabs and assign custom fields. You can define the custom fields in the Input form table. These fields are available for all input forms, so you can reuse one field.

    More information: add tabs and assign custom fields.

    You can place various fixed fields on the input form yourself via the properties of the input form. You can use this data to match and/or automatically create a person/organisation/contact. In addition, you can use the Management Tool to add custom fields to the form. These are not automatically incorporated into the process.

    For every input form, Profit automatically adds a tab in the Management Tool with the same name as the input form. Thus for each input form you can add tabs and assign custom fields.

    You can define the custom fields in the table [Input form]. These fields are available for all input forms, so you can reuse fields (such as the Number of employees field in AFAS). Because the custom fields of all input forms are defined in a single location, it may occur that (over the course of time) a large number of custom fields are accumulated which are difficult to manage.

    Carefully plan in advance which fields you want to use in forms and where reuse of fields is possible. Standardisation in requested fields is important! For instance, try to avoid asking for Full name in one form and first name and last name separately in another form.

    To add fixed fields to an input form:

    1. Go to: General / In & OutSite / Input form / Input form.
    2. Open the properties of the input form.
    3. Click on the action: Management tool.
    4. Go to the tab: Tabbladen van 'Naam invulformulier'.
    5. Click on: New.
    6. Enter the name of the tab.
    7. Select a fixed field and use the > to drag it to the Fields on tab box.
    8. Repeat this for all fields you want to include on the tab.
    9. Click on: OK.

      If applicable, add another tab.

    To add custom fields to an input form:

    1. Go to: General / In & OutSite / Input form / Input form.
    2. Open the properties of the input form.
    3. Click on the action: Management tool.
    4. Go to the tab: Fields in the right-hand window of the Management Tool.
    5. Click on: New.
    6. Select the Field type. It is crucial to choose the correct field type, because it determines what you can record in the database.  For example, for a Y/N field users see a check box that can be set to yes (selected) or no (not selected).
    7. Enter the Label and the Column text. The label is intended for the properties windows, the column text is used for the view. Try to keep the column text short, this improves the clarity of the view.

      Note: 

      The name of a custom field cannot end with a hyphen (dash).

    8. Always enter a tooltip. This is an explanation for users, which they can retrieve using F12.
    9. Complete the fields. The other fields depend on the Field type selected previously.
    10. Click on: Finish.

      Profit immediately restarts the wizard so that you can add the next field.

      Continue with the next field or click Cancel if you are ready.

      You can now add the fields to the tab that has been added for the input form. In addition to custom fields, you can also add fixed fields to the custom tab.

    To make custom fields mandatory:

    For matching data from the input form, visitors are required to enter their last name or company name. You can make these fields mandatory.

    1. Go to: General / In & OutSite / Input form / Input form.
    2. Open the properties of the input form.
    3. Click on the action: Management tool.
    4. Go to the tab: Context (in the right window of the Management Tool).
    5. Open the properties of the De organisatie field.
    6. Go to the tab:: Administrator settings.
    7. Select the Mandatory check box.
    8. Click on: OK.
    9. Open the properties of the De naam field.
    10. Select the Mandatory check box.
    11. Click on: OK.
  13. Log on and start Site management.
    1. Open the site.
    2. Log on with the username and password.
    3. Click on: OK.
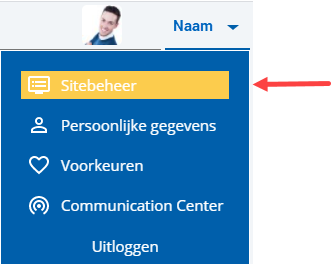
    4. Click on the user name at the top right.

      Ins_Sitebeheer opstarten (10)

    5. Click on: Site management.

  14. Go to: the page on which you want to add the input form. 
  15. Click on: Properties.
  16. Click on: Edit (in the Page frame).
  17. Select the Input form added.
  18. Click on: Save.
  19. Click on: Publish.

    If you want to add a reference, refer directly to the 'protected' page and not to the input form.
Directly to

  1. Add an input form
  2. Add a registration form
  3. Add a signup form
  4. Copy or complete personal details
  5. Complete an input form multiple times automatically in a single session
  6. Add fields to an input form
  7. Attachment allowed for input form
  8. Link an input form to a template
  9. Register an anonymous participant immediately for a course